Showing posts with label Tutorial. Show all posts

July 21, 2011

Apron Box Tutorial

Good afternoon everyone! 
I thought that today would be a great time to post my tutorial on how to make my apron box.  Then it gives you time to play around with it this weekend ~ yup, that's me...  Always thinking Ü

So are you ready?  Here we go!  And please remember that you can always click on a picture to make it larger - just remember to hit your back button to come back...
You will need a piece of sturdy cardstock that measures 5 3/4" x 11".  You are going to score the 11" side at 1/2", 5", 5 3/4" and 10 3/4".  Turn your paper to the 5 3/4" side and you will score it at 2 1/2" (as shown in the picture above, not all the way across) and at 5". 
Now you will cut away the pieces as shown above.  What you are left with is actually the piece that will be the front of the apron box.  I also like to cut the flaps on a slight diagonal.  I do this with all different boxes and such that I make ~ it gives it a better finished look without little pieces sticking out over. 
You will now add your adhesive.  Actually all you need is to put two strips down. For most of my boxes I like to use the red line tape because it is super sticky and I know that whatever I make will stay put together. 
You are going to cut away the top part of the box, this will now form an apron.  I actually used the side of my ATG gun to make the curve.  Keep these pieces, you will need them as a guide for the next step. 
You are going to flip your cardstock over and decorate it, this is the front of your apron.  I used the cut out pieces to help as a template to make the curves on the DSP.  This is actually DSP from the Stampin' Up!™ Summer mini called Nautical Expedition.  I beleive that I used a piece that was 4 1/2" x 4 1/2" and trimmed it up.  The bottom piece was 2 3/8" x 4 1/2" before trimming.    
Once you have added your DSP to the box you will want to punch holes in it to add the jumbo eyelets.   
I used about 8" of ribbon for the neck.  I just threaded it thru the eyelets and tied knots in the back.  You can tie the knots in the front if you like or if you prefer you can just add the ribbon and secure it with tape to the back.  You can cover the ribbon on the back with an extra piece of cardstock.  I just like the look of the knots  
Once you have added the ribbon to the neck fold the box up and adhere it together.  You will then take another piece of ribbon (I used approx. 12 inches) and wrap it around the middle of the box.  This will cover the seam where the two papers meet and give it a little more of a finished look. 
Almost done!  To cover the ribbon seam in the back I added a box that I made with an additional piece of ribbon and I was complete!! 

See the wonderful recipe cards that I made to go with this box?  They are made with the stamp set From the Kitchen of.  How adorable would that be to make this little box and a set of cards to give to a bride at a shower, or someone who is just moving out on their own.  Or even a new neighbor with a plate of cookies - and of course the recipe to go with them!  There are many, many ideas that spring from this set.

If you have any questions please don't hesitate to ask, just send me an email.  If you'd like to order the supplies I used to make this box you can order them anytime 24/7 from my store HERE.

Thanks for stopping by and have a super great day!! 
Photobucket

January 17, 2011

Corsage Box Tutorial

Hello everyone!  As promised I am posting a tutorial on the corsage box that I created.  However this one is not for a flower card, I created a card for Valentine's Day to add to the box.  Are you ready to see it?  Here we go... and hang on, this will be a long post ~ sorry.
You'll want to gather the supplies needed:
You will want to create the bottom of your box base.  I took an 8" x 8" piece of Crumb Cake card stock and scored it at 2" on each side.  I then made a cut from the bottom to the score line as shown in the picture.  I also cut off the corners so it is shaped more like an octagon, this makes for a cleaner fold when putting the box together. 
Next take your 6 1/8" x 6 1/8" piece of Crumb Cake card stock and score at 1" in on all 4 sides - find a die or punch to cut the center out with.  I used my Nestabilities Labels 9 die.  I like to take a small piece of tape to secure it to the paper so it does not shift when putting it thru your cutting machine.  Try to keep it in the center as much as possible since this is your box lid.
Next you will take one of your 3 7/8" x 3 7/8" pieces of decorative paper, here I used the red Glitter paper that is in our Occasions Mini right now and used the same die to cut it out as did the box lid.  It's ok to use a small piece of scotch tape to keep it in place.  Save the cut out piece for use later. 
Before you put your box lid together add adhesive to the back of your red glitter paper and attach your window sheet (or acetate) then attach that to the top front of your box lid. 
You will do the same as you did with the box bottom, make the cut marks up to the score line as shown and add adhesive and close your lid together.  
You are almost done, your box is almost complete. 
(SO Sorry for the color in the picture, I don't know what happened)
You will need 4 pieces of ribbon.  One will be 17" to go around the box lid.  I add tape to the entire piece to make sure that it is secure.  I'd rather over tape than not have enough and have it fall apart.  The other three pieces are for the bow for the front ~ and please ignore the tape.  You will need an 8" length, a 6 1/2" length and a 1 3/4" length.   
Wrap the 8" length together then add the 6 1/2" length to the top of that.  You will add tape to the back of the 1 3/4" section because that is what holds the "bow" together - as shown in the picture. 
Now add the bow to the front of the box - it will cover the seam also.  I used my strong sticky tape but you could use a glue dot if you like.
Next I punched out 5 hearts and ran them thru with my dots folder, then score 4 of them down the center as shown. 
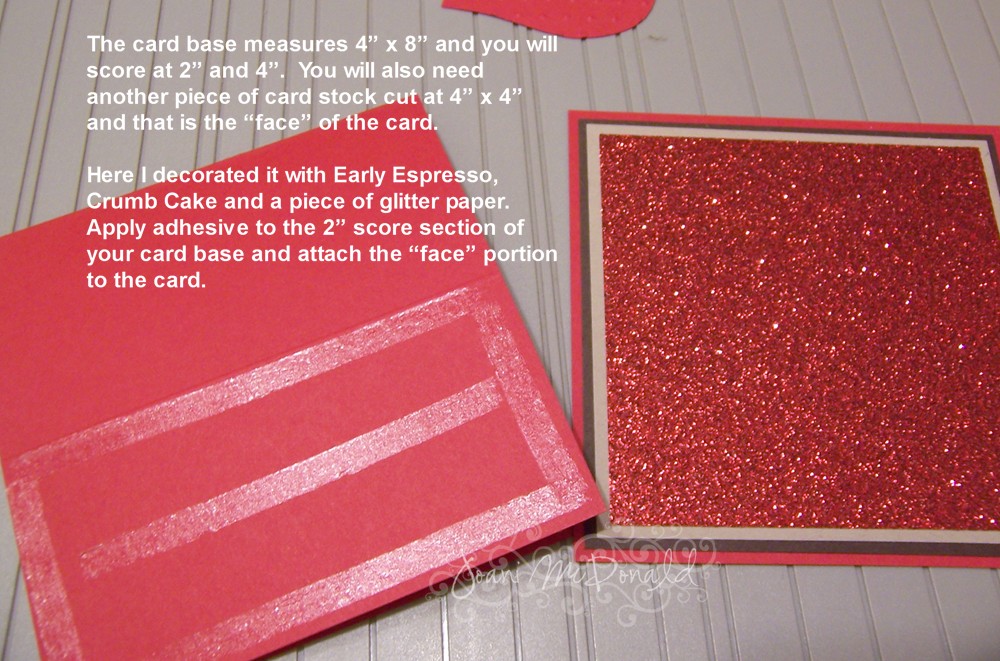
What I like to do is attach all my pieces of the card front together first then attach them to the card.  As you can see I took my 4" x 4" piece of Real Red card stock and then attached the piece of Early Espresso, Crumb Cake and red Glitter paper layers to the front - now add adhesive to the bottom 2" portion that you scored on the 4" x 8" piece of Real Red card stock base.  Still with me??
The first thing that you want to do is add the heart that is not scored to the center of the card front, you can use this as a base.   
Now you will take the 4 scored hearts and apply adhesive to each back to stick together. 
See them coming together? 
I took my red line tape and applied that to the back of the heart fan, you want a strong adhesive because it is a little heavy and you'll find that people will play with the hearts - so you want them stuck down really well. 
I turn the card upside down so I can see it better, and place the heart fan on top of the heart you've placed down already on the card front. 
This is how it should look so far. 
So let's work on the inside of the card.  Take your remaining pieces of Early Espresso and Crumb Cake and glue them down to the inside of the card.  Remember the red Glitter paper shape that we cut out from the top box lid piece?  You can use this on the inside too - way to recycle Ü  I inked up a portion of the stamp Be My Valentine with my Chocolate Chip marker on Real Red card stock and cut it out.   
See how the inner part of the card came together? 
Now you should be complete.  Not too difficult, just a little time consuming. I think that anyone would love to get a Valentine as sweet as this.
I hope that you enjoyed this tutorial ~ if you did please be sure to leave me a comment.  And have a super great day! 

Photobucket