January 26, 2011

Shabby Chic or just plain Shabby?

I thought you'd like to take a peek at my newest creation.  I like to think of it as "going green" or recycling.  I used our local newspaper for some of the back ground paper.  I made some cards for Danielle's co-workers for her to give out on Valentines day and this is what I came up with.
Stampin' Up! has some yummy DSP paper that I do not have yet ~ so I improvised!  I used the local newspaper.  Tacky?  I don't know, it seems to give this card a little touch of "old".  I kinda added my own little touch to it with the "local news" addition... he he he... 

Here are the details:  The base card is Real Red that I layered with some Pink paper that I ran thru my cuttlebug with the mini hearts folder.  I then cut a panel of the paper up and layered it on to a piece of Real Red card stock.  I added a piece of Springtime Vintage paper (from the Occasions Mini) that I used my scallop trim border punch and added some old lace and some yummy Rose Red seam binding tape to the top.  I stamped the heart(Be my Valentine) in Real Red ink and again on a scrap with Rich Razzleberry ink and added that to the top of the heart.  I pop dotted that layer to the card.  I've wanted to use my hat pins for a long time so I added those with a few beads and pearls to the card ~ they can be a little bulky since they are not being mailed.  
Here's the close up ~ pretty, huh?  Do you think that it is a little to shabby - or just chic enough??  Let me know, I'd love to hear your comments.  Thanks for stopping by today.
Photobucket

January 25, 2011

Sale-a-Bration is here!!

 
(Click on the cover and you can view the catalog online)
It's here!! It's here!!  The current sale-a-bration mini is here!!  Can you see the excitement ~ can you, can you?  What does this mean for you??  Free products, silly!
 · · { host } · ·
· · { spend } · ·
free
Spend $50* and earn one
Sale-A-Bration product of your choice.
· · { join } · ·
Join Stampin’ Up!
demonstrator during Sale-A-Bration
and get 15% off your Starter Kit.
Plus, get a bonus bundle filled with
over $50 in free products!

*Net sales before shipping & handling and tax

(Click on the above banner be taken to my online store.)

Sale a Bration is the biggest promotion of the year!! Stampin' Up! offers a free Gift when you spend $50 between January 25 and March 31, 2011 !! No LIMIT... spend $100 get 2 gifts, spend $150 get 3 gifts AND Hostess Rewards!

It's also a great deal if you want to become a demonstrator.  I'd love to welcome you to the Stampin' Up! family ~ join today and here is a sample of what you will receive, there are two different options you can choose:

Stampin' Up! Starter Kit:

$175 ($310 value)

15% off from 1/25 to 3/31/11
during the sale-a-bration promotion is only

SALE PRICE: $148.75
The Starter Kit created exclusively for new demonstrators, contains Stampin' Up! essentials you'll need to get started in your new business, including:
  • Five complete stamp sets (including a clear-mount set and clear-mount block)
  • A Stampin' Around wheel, handle, and ink cartridge  
  • Assortment of Designer Series paper and card stock
  • Four Classic Stampin' Pads
  • Two Stampin' Write markers
  • VersaMark Pad
  • Whisper White 5/8" satin ribbon
  • Songbird Décor Elements and applicator
  • Adhesives
  • Blender pen
  • Stamping sponge
  • Stampin' Scrub and Mist 
  • Box of Idea Book & Catalogs
  • Business forms and tools

Digital+ Starter Kit
Price: $175  (over $320 value!)
15% off from 1/25 to 3/31/11
during the sale-a-bration promotion is only

SALE PRICE: $148.75
Digital+ Starter Kit Contents: 
  • My Digital Studio software suite
  • Three complete stamp sets (including a clear-mount set and clear-mount block)
  • Assortment of card stock
  • Four Classic Stampin' Pads
  • Two Stampin' Write markers
  • Real Red 1/4" grosgrain ribbon
  • Brights Designer buttons
  • Songbird Décor Elements and applicator
  • Adhesives
  • Stampin' Scrub and Mist 
  • Box of Idea Book & Catalogs
  • Business forms and tools
A few of the things that you can look forward to being a Stampin' Up! demonstrator are:

1. To enjoy 20% instant income on all purchases (that's an instant 20% savings)

2. To earn up to 40% commission on personal purchases and customer sales

3. Extra income. You'll earn extra income based on your sales and recruiting--how much extra income is up to you.

4. To receive our full color Stampin' Success monthly magazine - great tips, techniques, samples

5. To host a Demonstrator only website that allows your family and friends to shop online from you 24 hours a day

6. To attend Stampin' Up! demonstrator events - Convention, Regionals.

7. To know about specials, retiring items, company announcements before the public is informed

8. To earn extra income for holidays or to help out in these economic tough times

9. Support from Stampin' Up! with support materials, including a monthly magazine, workshop ideas, and audio and video trainings on all kinds of topics available on our Demonstrator Web Site.

10. To enjoy the perks on your terms - as little or as much as you like - what days of the week, how many days of the week - what types of events

I would love for you to join my team ~ if you are interested in either becoming a demo, placing an order, wanting to book a workshop or have a catalog party please feel free to email me anytime @ joanmcdonald@roadrunner.com
Photobucket

® by becoming afree products.
 
Host a workshop of at least $300*,
and earn one free Sale-A-Bration product in addition to the generous
hostess benefits.

January 24, 2011

Woo-Hoo!! Tomorrow's almost here and so will be the Occasions Mini

It's been long awaited, but tomorrow will be bringing the new Sale-a-Bration catalogue to us!  Yes, that's right ~ Sale-a-Bration!! 
The 2011 Occasions Mini Catalog (January 4-April 30, 2011) contains all-new stamp sets, accessories, Designer Fabric, dies, and more--with many coordinating products you will love!  So make sure you visit back tomorrow for a first chance look!!
Photobucket

January 21, 2011

Another Birdhouse

Did you like the birdhouse yesterday?  Did it inspire you to create?  I hope so, because I've got another one for you today. 

Everything that I posted yesterday I used on this birdhouse also.  Just scroll down or check out THIS post to review all tools and paper used.   
Have a super great day!! 
Photobucket

January 20, 2011

Interested?

As I mentioned in the last post ~ Sale-a-Bration is only 4 days away!  And you all know what that means, don't you?  Free stamps!!  And who can not handle free stamps??

I am working on getting a monthly stamp-club together.  What's that you ask?  It is a group of 5 or 6 stampers who each month promise to spend at least $25.00 or $30.00 each month (depending on groups size) and take turns each month being hostess!  You will be eligible for hostess benefits - a free hostess stamp set, and at least $15.00 in free merchandise!  And not to mention the goodies that I include each month Ü

If you are interested please contact me and we can discuss it!!  You can also click on the tab at the top of my page titled "Join my Club".
Photobucket

I've gone to the birds!

I was bouncing around the internet a couple of days ago and I noticed an adorable little birdhouse that Nichole Heady had posted.  It was so darn cute I knew that I needed to make it!  You can make one too, just go HERE and she's got the PDF for you. 

So here is my version, ready...
So here's the deet's for you.  The base birdhouse is Bashful Blue that I stamped with a stamp from Thoughts and Prayers in Certainly Celery and Bashful Blue ink.  Around the entrance to the birdhouse I punched out a piece of Crumb Cake with my 1 1/4" and scallop circle punches to dress it up a bit.  To create the roof I used a piece of Bashful Blue as a base and I cut DSP Patterns Stack with my Perfect Setting Bigz Xl Die to layer the pieces.  I thought that it looked cute.   
See the ribbon thru the roof?  OMGoodness, it's great!!  It's actually 1/2" seam binding ribbon in Rose Red from the Occasions Mini Catty that is out.  There is so much yummy stuff in there, take a peek!  I created the tag with my Decorative Label punch out of Crumb Cake and stamped the birdcage from the Aviary set in Early Espresso ink.  It's hard to tell but the bird inside the cage is stamped in Soft Suede.  The reinforcement on top of the tag is actually one I made from scrap.  I filled the birdhouse with some crinkle paper left over from a Christmas gift and I was done.  So, what do you think??  Adorable.  And perfect for upcoming spring!!

Anytime I post a project or card and there is something that you see or like - I generally like to post a link to the product on my Stampin' Up! site.  If you'd like to place an order you can contact me anytime.

And now to talk a little about the Occasions Mini.  There is so many great new things in here - and of course they are all must have's!  Just click on the picture above to download the PDF or you can click on the picture in my sidebar of any of the current cattys and be taken to the PDF direct.

Stay tuned - tomorrow I will be posting more fun stuff!!

And only 4 more days til Sale-a-Bration!  Who needs free stamps??  We all do!  Stay tuned for that!!Photobucket

January 17, 2011

Corsage Box Tutorial

Hello everyone!  As promised I am posting a tutorial on the corsage box that I created.  However this one is not for a flower card, I created a card for Valentine's Day to add to the box.  Are you ready to see it?  Here we go... and hang on, this will be a long post ~ sorry.
You'll want to gather the supplies needed:
You will want to create the bottom of your box base.  I took an 8" x 8" piece of Crumb Cake card stock and scored it at 2" on each side.  I then made a cut from the bottom to the score line as shown in the picture.  I also cut off the corners so it is shaped more like an octagon, this makes for a cleaner fold when putting the box together. 
Next take your 6 1/8" x 6 1/8" piece of Crumb Cake card stock and score at 1" in on all 4 sides - find a die or punch to cut the center out with.  I used my Nestabilities Labels 9 die.  I like to take a small piece of tape to secure it to the paper so it does not shift when putting it thru your cutting machine.  Try to keep it in the center as much as possible since this is your box lid.
Next you will take one of your 3 7/8" x 3 7/8" pieces of decorative paper, here I used the red Glitter paper that is in our Occasions Mini right now and used the same die to cut it out as did the box lid.  It's ok to use a small piece of scotch tape to keep it in place.  Save the cut out piece for use later. 
Before you put your box lid together add adhesive to the back of your red glitter paper and attach your window sheet (or acetate) then attach that to the top front of your box lid. 
You will do the same as you did with the box bottom, make the cut marks up to the score line as shown and add adhesive and close your lid together.  
You are almost done, your box is almost complete. 
(SO Sorry for the color in the picture, I don't know what happened)
You will need 4 pieces of ribbon.  One will be 17" to go around the box lid.  I add tape to the entire piece to make sure that it is secure.  I'd rather over tape than not have enough and have it fall apart.  The other three pieces are for the bow for the front ~ and please ignore the tape.  You will need an 8" length, a 6 1/2" length and a 1 3/4" length.   
Wrap the 8" length together then add the 6 1/2" length to the top of that.  You will add tape to the back of the 1 3/4" section because that is what holds the "bow" together - as shown in the picture. 
Now add the bow to the front of the box - it will cover the seam also.  I used my strong sticky tape but you could use a glue dot if you like.
Next I punched out 5 hearts and ran them thru with my dots folder, then score 4 of them down the center as shown. 
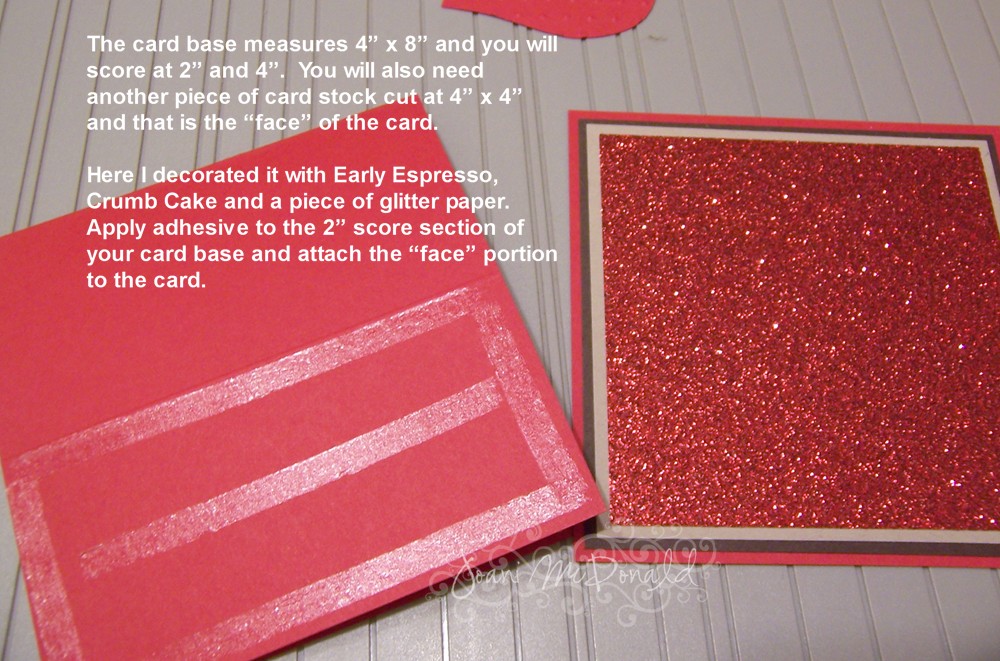
What I like to do is attach all my pieces of the card front together first then attach them to the card.  As you can see I took my 4" x 4" piece of Real Red card stock and then attached the piece of Early Espresso, Crumb Cake and red Glitter paper layers to the front - now add adhesive to the bottom 2" portion that you scored on the 4" x 8" piece of Real Red card stock base.  Still with me??
The first thing that you want to do is add the heart that is not scored to the center of the card front, you can use this as a base.   
Now you will take the 4 scored hearts and apply adhesive to each back to stick together. 
See them coming together? 
I took my red line tape and applied that to the back of the heart fan, you want a strong adhesive because it is a little heavy and you'll find that people will play with the hearts - so you want them stuck down really well. 
I turn the card upside down so I can see it better, and place the heart fan on top of the heart you've placed down already on the card front. 
This is how it should look so far. 
So let's work on the inside of the card.  Take your remaining pieces of Early Espresso and Crumb Cake and glue them down to the inside of the card.  Remember the red Glitter paper shape that we cut out from the top box lid piece?  You can use this on the inside too - way to recycle Ü  I inked up a portion of the stamp Be My Valentine with my Chocolate Chip marker on Real Red card stock and cut it out.   
See how the inner part of the card came together? 
Now you should be complete.  Not too difficult, just a little time consuming. I think that anyone would love to get a Valentine as sweet as this.
I hope that you enjoyed this tutorial ~ if you did please be sure to leave me a comment.  And have a super great day! 

Photobucket

January 14, 2011

Not fair, she's having all the fun!

It's so not fair, Betty is having all the fun...  Betty and Anne are on their trip in Nashville, TN at the Stampin' Up Leadership convention.  Betty is learning all these great things to come back and teach me, right Betty??

Of course she had to send me a picture.  This one was just after she walked the stage as a Supervisor!!  Woo-Hoo for Betty!!  And she's MY upline Ü
I also want to share with you a little sneek peek of something you might like to make for Valentine's Day for your sweetie.
More to come tomorrow!!  Have a great evening!Photobucket

January 13, 2011

Occasions Mini

Hello everyone!  I wanted to pop in and let you all know about the Occasions Mini that Stampin' Up! has released.  It is packed full of wonderful stamps, papers, fabric, embellies - oh, there is too much to even mention. 
So if you have not yet, take a peek!  Just click on the picture above and it will take your to the PDF download, or if your having trouble click HERE

Now as I sit and type my dear friend Betty is at Leadership in Nashville.  She's sending me texts here and there ~ and the last one was just after she walked across the stage for becoming Supervisor.  Way to go Betty!!  I'm with you in spirit (only because I could not fit in her suitcase Ü).

Now to make an offer to each of you.  Anyone who signs up as a follower of my blog, either by Feedblitz or follows me thru Google will receive a 10% discount on their 1st order placed with me.  This will only be valid if you e-mail me your order and not if it is placed thru my demo website.

I hope to work on something this evening to post tomorrow - just a little bit of inspiration.

Have a super great evening!!Photobucket